
Let me give you the low down. You can read some really in-depth information about microphones on the internet that’s simply not reality based. You don’t need to know how every piece of an engine works to be able to drive a car.
Even seasoned recording studio engineers couldn’t reel off a list of all the types of microphones, because we don’t use or even encounter them all in our day-to-day work.
The truth is that there’s very little knowledge you need to know to begin using a mic and most of it is ‘set and forget.’
What we’re going to do below is cover all of the basics, enough for you to be able to communicate with professionals and not be lost if they start blathering on, and we’ll do this all without using a ton of technical jargon.
You’re about to take a ride, with nothing but simple explanations and plain language, that will have you ready to use most any mic you encounter in the real world, while understanding why it is you’re doing the things you must to get the highest quality recordings or performance out of them.
It’s not hard and anyone trying to make it sound hard is blowing smoke. Let’s get this party started.
What it boils down to is that you need to know many types of mics exist, but you’ll largely only use two. Each may have ways to change the direction of the field of sound they record beyond just pointing it at an instrument or vocalist.
You need to know how to set the proper volumes, what the switches on them do, and how to connect them to the rest of your gear. Beyond that, there’s a few concepts you should know exist but don’t need to memorize them yet. It’s easy! Let’s cover it all in that same order.
Note: We’re keeping this simple, but if you see a topic below that you want deeper information on just click the link to our longer articles we’ve already written about it. We won’t leave you hanging, but you can ignore those links too for now and come back to them any time. Just take in the basics for now.
The Two Main Types of Microphones
If you searched for a list of all the microphone types out there, you’ll see short and long lists and many that disagree with each other. You’ll hear about shotgun mics, boundary mics, ribbon mics, and much more. But most recording engineers and hobbyists only ever use the two types below.
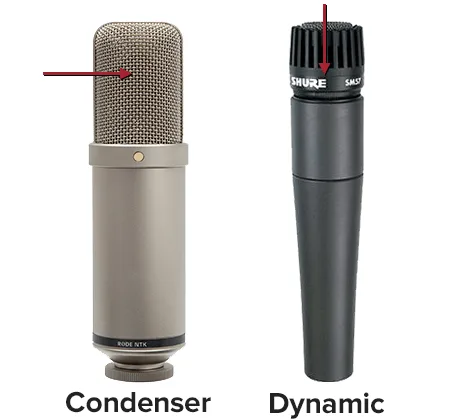
Dynamic Mics
Dynamic mics are the kind you see on stage most often, where the sound is aimed down the front of the mic. These can handle louder sounds since they’re less sensitive, not only to volume but to damage in general.
The diaphragm is a part that vibrates due to sound pressures and in dynamic mics it moves a magnet through a wire coil’s magnetic field. This makes electricity flow. This whole system is called a transducer, and it works differently in a condenser mic, which is what sets them apart.
Condenser Mics
Condenser mics are the kind you usually see in recording studios. The sound is aimed into the side of these mics, which is why you see some of them pointing to the ceiling and some hanging upside down, because it doesn’t matter as long as the correct side is aimed at the sound source.
They are more sensitive to smaller changes in volume and can pick up tiny nuances, which is why they’re preferred in the studio when the acoustic environment is tightly controlled.
But you can damage the larger diaphragm or tube (if it has one), by recording a source that’s too loud or dropping it. The transducer works by allowing the diaphragm to vibrate closer and further from a charged metal plate, and this plate is why condenser mics need Phantom power or some other power source like a battery or its own power supply.

All of the above will be reiterated again below, and it will all click for you as you continue reading.
Microphone Pickup Patterns
A lot of mics are pretty simple to use. You point it at the sound you want to record or broadcast and that’s it. But many also offer ways to change the sounds it picks up without changing the direction you point them. These ‘ways’ are settings called pickup patterns.
You’ll often see these pickup patterns referred to as polar patterns, polarity, and directionality. They all mean the same thing. Most mics that don’t let you change the pickup pattern are set to cardioid.
This is the most common pattern, because it picks up a wide field in front of the microphone while blocking out noise coming in from behind.
Think about a singer on stage. You don’t want the sound of the crowd cheering and singing along, coming from behind the mic, being played back out of the speakers.
You only want the singer’s voice being captured from in front. Most of the other pickup patterns are variants on the cardioid pattern, although there are other useful ones that you’ll still rarely use.
All of these patterns come in three basic flavors:
- Unidirectional
- Bidirectional
- Omnidirectional
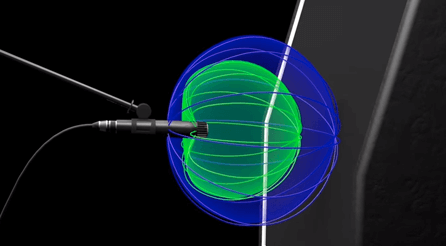
In order, these mean that the mic will record sounds from only one direction (front), two directions (front & back), or a full 360 degrees. You’ll typically only ever use the cardioid pattern, which is unidirectional. It looks like this:
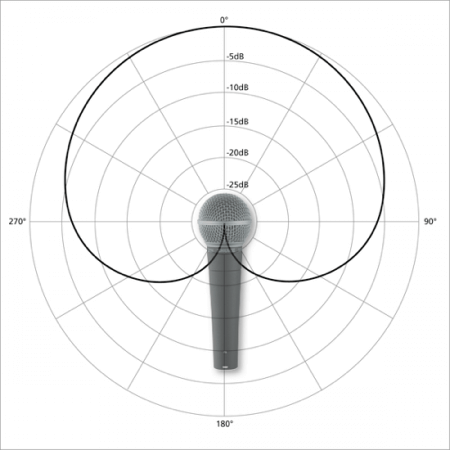
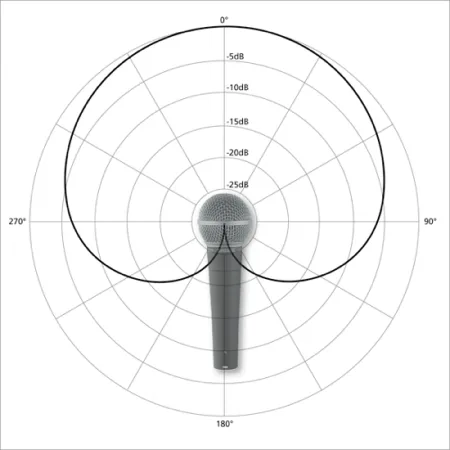
It largely only picks up sound from the front, but will still capture some sound from the sides, albeit at a lesser volume. That’s because these patterns have a sensitivity to them as well, as seen in the image where the dark black lines extend further out in the circle, which corresponds to higher volumes (measured in decibels).
Read More: Microphone Pickup Patterns: Understanding & Using Directionality
This sensitivity can be used by experienced vocalists and instrumentalists. You’ll see singers move further away from the mic when they become louder in order to control their levels better. But studio engineers can exploit a feature of the sensitivity too, which we’ll talk about next.
The Proximity Effect
Whether you’re setting up a mic on stage or in the studio, you will usually use the close miking technique. To keep it simple, this means you’ll place the mic within 12 inches away from the sound source and no further.
This helps you increase the volume of what you intend to record, which serves to decrease the other noise you don’t want, like the whirring of a computer or other instruments.
Read More: Close Miking: Why, When, & How?
You’d think all was well and fine. You just cram the mic real close to a vocalist and you’re done. But there’s a strange effect that occurs when you start closing the gap between the sound source and the microphone.
As you tighten the gap from 12 inches and less, you’ll start to get a boost in the bass that increases in volume and decreases in frequency. This is called the proximity effect.

It’s nothing for you to worry about yet, but you should know about it. It’s the secret of how radio DJ’s get that smooth, deep voice. Certain microphones have a more pronounced proximity effect than others. It should also be noted that various pickup patterns exhibit this effect differently. Stick to cardioid if you want to use it.
Read More: The Microphone Proximity Effect
You mainly only find this in dynamic mics, since condensers are too sensitive to be super close to the sound source. Close miking with condensers is fine, but you can damage them with too high of an SPL (Sound Pressure Levels).
Gain Staging Levels for Mics
This is the most important part of every discussion about microphones, so pay attention! When you record the signal coming out of a microphone, it has a very low electrical amplitude. This amplitude is the same thing as volume.
Every single day, some newbie out there tries to record a mic and wonders why the volume is so low and this is why. Microphones spit out a mic-level signal. It is far quieter than an instrument-level or line-level signal.
Mic-level signals must be boosted using a preamplifier. No, you can’t just turn up the volume because you also crank up the noise. Preamps turn up the signal without turning up the noise and are the only way to get a high quality recording.
In fact, the preamplifier is more important to the your quality of your recordings than the mic itself is. You adjust the volume of your mic by outputting the signal to the input of the preamp and then adjusting the gain knob. Gain can be thought of as a volume knob for the time being.
Read More: What is a Preamplifier? Why Do We Need Them?
Let me save you some worry. If you’re here to learn before you buy some stuff to start recording, you’re fine. You likely know what a recording interface is and does, for the most part. Those have preamps included in them, so you won’t have to buy any extra piece of gear.
So we were talking about adjusting the volume of the mic using the gain knob, but that begs the question of what volume should we aim for. This is a huge discussion that we can’t cover here completely, so let me condense it as far as possible.
When you’re recording in Pro Tools, Logic Pro, FL Studio, or whatever, you’ll be monitoring your levels that are coming in. You do not want to push your volume up towards 0 dB. You want it averaging around -18 dB in the computer.
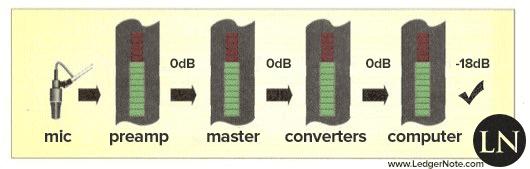
Please read the article linked below to fully understand why. It’s critical if you want to maximize your audio quality.
Read More: Gain Staging – Levels are Everything for High-Resolution Recordings
This is the only part of the basics that you have to investigate further. You don’t have to do it now but bookmark the article above for later. All amateurs mess this up and that’s a huge part of why their recording quality sucks.
Microphone Basics: Phantom Power
Microphones generate an electrical signal when you move their diaphragms, but not all of them can do this without their own source of power.
Dynamic mics, due to the way they’re built, don’t need an external power supply, but condensers do. You have to charge the plate that the diaphragm moves towards when it gets hit with sound pressure.
Some condenser mics require a battery to be put into them. Some high-end options will come with their own power supply. But most rely on the preamp to supply this power in the form of Phantom power.
The short version (check out What is Phantom Power? for the long version) is that the preamp will send +48 volts of power up the XLR cable to feed the mic. It’s really no more complex than that. Read the documentation for your condenser and it’ll tell you if you need it or not. If it has a battery or power brick, then you don’t need it.
The most common questions are whether or not you’ll damage your mics if you turn on the Phantom power for mics that don’t need it. The answer is no. It’s a tiny amount of voltage.
You won’t hurt anything. The one thing you want to do to play it safe is to make sure you turn the Phantom power off before you plug in or unplug the mic cable, though.
Microphone Frequency Response
There’s not much for you to do regarding the frequency response of a mic other than read the charts offered by the manufacturers or engineers who measure the mics again. You can’t change it (other than the two methods below, sometimes offered with switches on the mic) until you begin mixing with an equalizer.
What you’re really doing when you read frequency response charts is determining the flavor of the mic. Some are ‘transparent’ and spit out a very neutral version of what they hear, while others have a ‘coloration,’ meaning they alter the sound is some way. You usually see ‘colored mics’ come in two types: bright and dark.
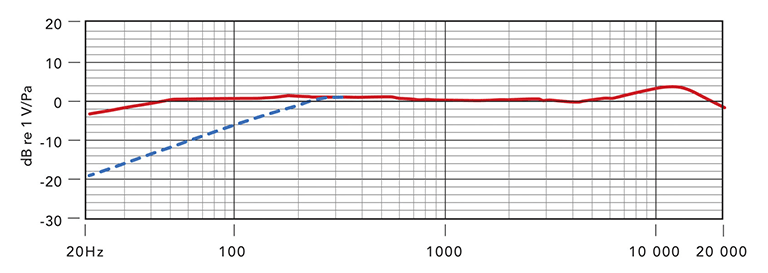
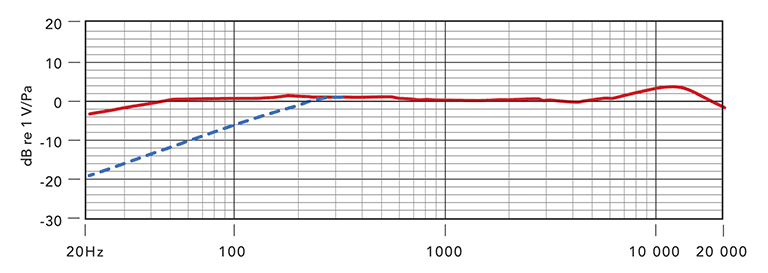
All this is talking about is the frequency response and if the upper frequencies have a bit of a boost or if the lows do. You’ll want to make the decision based on what instruments you intend to record and whether you’re a male or female vocalist with a deep or high voice.
Some perform better on different sound sources, and this is the reason studios have a mic locker full of different mics, so they can place the most appropriate mic in front of the current vocalist or instrument.
If you’re on a budget, you’ll do better to get a neutral or bright mic, which should sound decent on any source you use it on. You’ll do the rest in the mixing stage anyways.
High Pass Filter & Bass Roll Off
As mentioned above, there are two ways you can alter the frequency response of a mic during the recording process itself. Not all mics feature these switches, but those that do typically have two or three.
Some will have a pickup pattern switch and others will have a pad switch to reduce the output amplitude by -10 dB, in case you’re recording a very loud source or one with highly variable volumes.
The main switch I want to tell you about will be labeled in one of four ways. They all indicate the same function. These labels are high pass filter, low cut filter, bass roll off, or just an image of a slanted line representing the bass region of the frequency response.
These all reduce the volume of the bass that makes it into the actual outputted signal, but do so gradually the deeper the bass frequencies are.
For example, this roll off may start as high as 100 Hz to 200 Hz at a 1 dB reduction. By the time you hit 60 Hz you may be at 3 dB. At 40 Hz the volume will be reduced by 5 dB. And at 20 Hz and below you may be looking at up to 10 dB of dampening.
The reason for this is to block out a lot of ambient noise like rumbles traveling through the floor and up your mic stand, or the low humming of your air conditioner from outside or another room. Most instruments and vocalists won’t make sound in these regions anyways and you’ll benefit by engaging the switch.
But remember, you can always perform this roll off later during mixing if you don’t want to commit to it up front. I think that even if you do use the switch, your mixing engineer is going to roll off that region regardless. The choice is up to you, but don’t use the switch if you’re recording a cello or bass guitar through an amp, etc.
The Main Types of Microphone Cables
This is short and sweet. You’ll see two main types of cables coming out of traditional microphones. These are the XLR cable or a TRS (or TS) cable. These days you see a lot of podcasters and streamers buying USB microphones that use USB cables but I don’t recommend those personally.
When you’re cramming the preamp and converters all in the mic together, you can typically be sure all the parts are mediocre at best, especially considering the low costs of these USB mics. Everyone knows what a USB cable is, so let’s look at the other two.
XLR cables usually carry mic-level signals and are balanced, which basically means they don’t accumulate electrical noise over long distances (they manage to remove the noise by inverting a copy of the signal, you can learn more at the link just above).
Sometimes you’ll see mics with TS cables, which are unbalanced and accumulate noise. They can only carry mono signals and are usually used for instruments, so you could say they typically carry instrument-leves signals. TRS cables are the stereo-capable, balanced version of the TS cable.
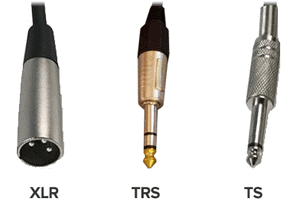
The story behind the name of the XLR cable is long, but the summary is that it stands for X-series connector with a Locking tab and Rubber ring. TS means Tip-Sleeve, while TRS stands for Tip-Ring-Sleeve, which is how you can visually identify the two.
For most studio quality microphones, you’re going to nearly always see XLR cables being used, but you will most definitely encounter a ton of TS and TRS cables with the rest of your gear.
Microphone Basics: Plosives & Sibilance
This section concerns the process when recording vocals only, but you should know the words plosive and sibiliance and what they mean.
Plosives refer to the “explosive” sounds made by singers when they form syllables that start with a P and a B. We have to blow a tiny bit of air quickly to create those syllables and our sensitive mics can pick those up. The way to deal with these are three fold, and I recommend using at least two of the methods every time:
- Turn the mic a tiny bit off axis to allow the air to pass by the diaphragm instead of colliding with it.
- Use a pop filter which intercepts some of this air and forces the vocalist to keep a certain amount of distance.
- Use a wind screen to catch any remaining air bursts headed towards the microphone.
The first two will usually get the job done, but if you don’t want to take any chances, you can use all three. If you purchase a high quality pop filter and wind screen from a respectable studio gear company, they won’t negatively affect your sound quality.
Read More: Taming Sibilance and Plosives
Sibilance refers to the piercing sound made by many singers when they form syllables that start with an S or a T. A lot of air is pushed through a tiny gap between your tongue, the roof of your mouth, and the back of your top teeth to form these syllables, and that can contain a hidden and very high pitch burst of air. We don’t usually detect it in day to day life but our sensitive mics pick them up.
The way to deal with this is by using a de-esser (It means what it sounds like. It removes the S sound). A de-esser is basically a compressor with an equalizer side-chained.
This means that you can tell the compressor to reduce the volume of sounds specifically at the frequency the sibilance is coming in at, without affecting the volumes of the rest of the frequency response.
What to Consider When Purchasing a Mic
You can get quickly overwhelmed when you start hunting for your first microphone. You need some parameters set around you to narrow the options.
The first thing to consider is what will be the main use for your mic. Is it to record vocals and guitar? Do you want to mic a guitar amplifier? Maybe you want to record piano.
Or do you want one that can do it all? These questions should guide you towards your first narrowing choice regarding coloration and the frequency response: “Do I need a bright, neutral, or dark mic?”
You can find lists of these online to help you through your journey. My suggestion is to go bright or neutral for anything but bass instruments or a bass vocalist. For those, go dark.
These same questions will help you determine if you need to be able to change the pickup patterns on the mic. If you’re recording piano you’ll need something that can act more as a “room mic” unless you plan on getting two and setting them up in stereo.
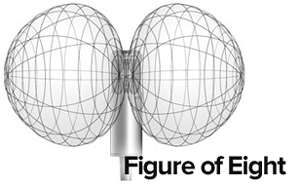
Or maybe you want to record vocal duets but can only afford one mic, in which case you might look at mics capable of the Figure of Eight pickup pattern.

One last thing to consider is whether you want a condenser mic or a dynamic mic. This is usually based on two things. The first is which environment you’ll use it in. If you’re taking it on stage, you’ll want a dynamic so it’s not so sensitive it’s picking up the sound of everything else going on around you and in the crowd.
For the studio I typically recommend a condenser, unless the sound source is incredibly loud and you still need to close mike it for isolation. In that case, get a nice dynamic mic.
And of course, the final determining variable will be your budget. If you’re in the “neutral or bright” camp, you’ll probably be looking for a condenser mic.
Look no further than this article below to get some great recommendations in all budget ranges. We don’t include any dark condensers, but they definitely exist.
Read More: The Best Condenser Microphones for Pro & Home Studios
Regardless of the coloration flavor, if you need a dynamic mic then we have you covered with the article below. Again, we’re sharing our favorite choices in all of the budget ranges.
Once you narrow down your type and venture into one of the above links, you’ll find our recommendations and also links out to some of our recording and mixing tips for each use case as well.
What You Need To Use a Mic
Finally, let me clear some confusion for you here. Most everyone knows you can’t just buy a mic and start recording. This is the reason USB microphones hit the market, to try to solve this issue. There’s quite a bit of recording gear beginners will need to fully produce music and record vocals. The mic is only one piece of this puzzle.
But the trick is on them because you’ll never reach the quality level of a full-on setup. There most certainly is a barrier to entry, but one that’s easier to overcome than people think.
Of course you’ll want a mic stand of some kind, and probably a pop filter and wind screen. You may even need an XLR cable if the mic you choose doesn’t come with one. But what about the non-obvious items?
I’m not going to dig into these, but you should be aware that you technically need the mic outputting its signal to a preamp that passes it on to analog-to-digital converters. From there, the signal is passed to your computer through a USB, Firewire, or Thunderbolt cable (typically for most people).


Now, don’t get upset. You don’t need to buy all of these items separately, although you can and possibly will eventually if you really get into recording. But there’s a thing called an audio interface that has all of that contained in one box for you.
All you’ll do is plug your mic into it and set the preamp gain, and the rest is done for you like magic. When you get to that stage, you will definitely need a quick explanation how to actually get the thing to record though. I have you covered:
Read More: How to Set Up Your Audio Interface to Record Audio
So to reduce it down to the essential microphone basics, what you really need is a mic, an audio interface, and a computer. You can consider everything else as cheap accessories.
Those Are the Microphone Basics…
This article is absolutely the fastest crash course you’ll find on microphones that’s actually complete and doesn’t try to impress you with big words. Recording through a mic doesn’t have to be a difficult task.
Once you plug everything in and set up your DAW (digital audio workstation) software to record, you’ll be good to go. It’s set and forget for the most part. You can’t operate without one so check out our list for the best DAW for you and snag one.
It’s good to get this technical stuff out of the way so you can get back to the artistic side of your operation. Thanks for sticking through my short lesson on the microphone basics.